 spa77 NetworkMinecraft server network
「えこらいふ!」 (Ecolife!) guideWhat to do first on 「えこらいふ!」 (Ecolife!)
What to do first on 「えこらいふ!」 (Ecolife!)
Illustrations and screenshots may show Japanese labels. The text below explains the same features in English.
This page summarizes what to do first after entering the living server 「えこらいふ!」 (Ecolife!). Read in the order of how to use the lobby, how to choose a destination, and your first quest, and you can start playing.
If you have not completed joining yet, see How to join first.
1. Arrive in the lobby
After verification, you enter the lobby. The lobby is the server’s entrance: a Japanese-modern floating island styled like a hot spring town. There are 7 torii-style gates in total toward the east, west, south, and north.
-
Player-versus-player combat, or PVP, is disabled in the lobby.
-
Use the dedicated worlds for building and gathering resources, rather than the lobby.
Gathering resources in the building world is prohibited for any reason.
Guide villager and smartphone
Right-click the lobby’s guide villager (named 「スマホ案内係 (右クリック)」, meaning Smartphone Guide (right-click), above its head) to open the smartphone menu.
You can also use /phone, which is recommended
Open chat and enter /phone to open the same menu from anywhere without finding the guide.
- Computer, Java Edition: press T or / to open chat, type the command, and press Enter.
- Phone, Switch, or other Bedrock devices: open the chat-bubble icon at the top of the screen, type with the keyboard, and send.
On your first visit, you also receive a Smartphone item. It opens frequently used features; right-click it to open. If you lose it, use /phone get to get another.
Messages on your first join
Three seconds after your first join, the title 「えこらいふ! へようこそ」 (Welcome to Ecolife!) appears in the center of the screen. The subtitle is 「東の門「資源サーバー」をくぐろう」 (Go through the east gate to the Resource Server). Chat also shows 「まず、ロビーの東にある「資源サーバー」の門をくぐろう。詳しい案内は/guide」 (First, go through the 「資源サーバー」 gate on the east side of the lobby. For details, see /guide).
While you remain in the lobby, the action bar at the bottom of the screen keeps showing 「▶ 東の門「資源サーバー」をくぐろう」 for 2 minutes or until you enter the Resource Server or Resource Server 2. When you enter the Resource Server or Resource Server 2 for the first time, after the random teleport’s 「到着!」 disappears, the title 「クエストを始めよう」 (subtitle 「/deeds で初めての人向けのクエストを開く」) and a chat line that opens /deeds when clicked appear.
On the day of your first join, the first login reward arrives 10 seconds after joining, with chat and sound only (without a title). On your second and subsequent joins, it arrives after 3 seconds, and the title appears.
You can also use /guide for a short in-game guide or /rules for rules.
2. Choose a destination from the lobby
The main way to travel between worlds is to choose a destination using the lobby gates or smartphone.
There are mainly 2 ways to choose, and they offer different destinations, so check them first.
| Method | Destinations | How |
|---|---|---|
| Gates | Resource Server, Resource Server 2, Building Server from Lv1, Resource Nether from Lv1, Resource Nether 2 from Lv1, Resource End from Lv1 |
Go through the torii-style gates around the lobby: east is Resource Server and Resource Server 2, west is Resource Nether and Resource Nether 2, south is Building Server, north is Resource End |
Smartphone through /phone or the guide |
Resource Server, Resource Server 2, Resource Nether 2 from Lv1, Building Server from Lv1 | Open the phone, choose 「その他の機能」 (Other features), then 「移動」 (Travel), then 「資源サーバーへ」 (To Resource Server), 「資源サーバー2へ」 (To Resource Server 2), 「資源ネザー2へ」 (To Resource Nether 2), or 「建築サーバーへ」 (To Building Server) |
Your first move is the east gate to the Resource Server; the steps after that are in What to do first on 「えこらいふ!」 (Ecolife!). The phone also handles jobs, land protection, and checking your goals, not only travel. For the Resource Nether or Resource End, use the gates.
The east, west, and north sides each have 2 gates (the south has 1). See Worlds and travel for gate locations and destinations.
Destinations and required levels
| World | Purpose | Required level |
|---|---|---|
| Resource Server | Gathering resources | Lv0, available immediately |
| Resource Server 2 | Gathering resources | Lv0, available immediately |
| Building Server | Building; resource gathering prohibited | Lv1 |
| Resource Nether | Gathering Nether resources | Lv1 |
| Resource Nether 2 | Gathering Nether resources; connected to Resource Server 2 | Lv1 |
| Resource End | Gathering End resources | Lv1 |
The Resource Nether, Resource Nether 2, and Resource End are also for gathering resources, but they require Lv1. This helps new players avoid losing their belongings in accidents.
From Lv1, you can also travel directly by Nether portal between the Resource Server and Resource Nether, and between Resource Server 2 and Resource Nether 2.
See Worlds and travel for details.
Return to the lobby
To return from your current world to the lobby, use the command below. The short form /l works the same way.
/lobby
/l
For 5 seconds after attacking a monster or being attacked, you are in combat. During that time, you cannot return to the lobby.
3. What to do first
When you reach the lobby, go through the east gate to the Resource Server (or Resource Server 2). When you enter for the first time, guidance appears after the random teleport, and clicking the chat line or running /deeds (/goals opens the same screen) opens the quests for newcomers. Quests also appear on the phone’s home screen.
The quests are, in order: 「はじめの一歩」 (First Steps) → 「石器時代」 (Stone Age) → 「暮らしの準備」 (Getting Settled) → 「はじめての依頼」 (Your First Request) → 「建築ワールドへ」 (To the Build World). Each time you finish one, chat displays the next quest’s task in a single line. The notices for 「暮らしの準備」 (/jobs browse) and 「はじめての依頼」 (/irai) can be clicked to open. When you finish all 5, chat shows 「ロビーの湯守りが、温泉街を案内してくれる」.
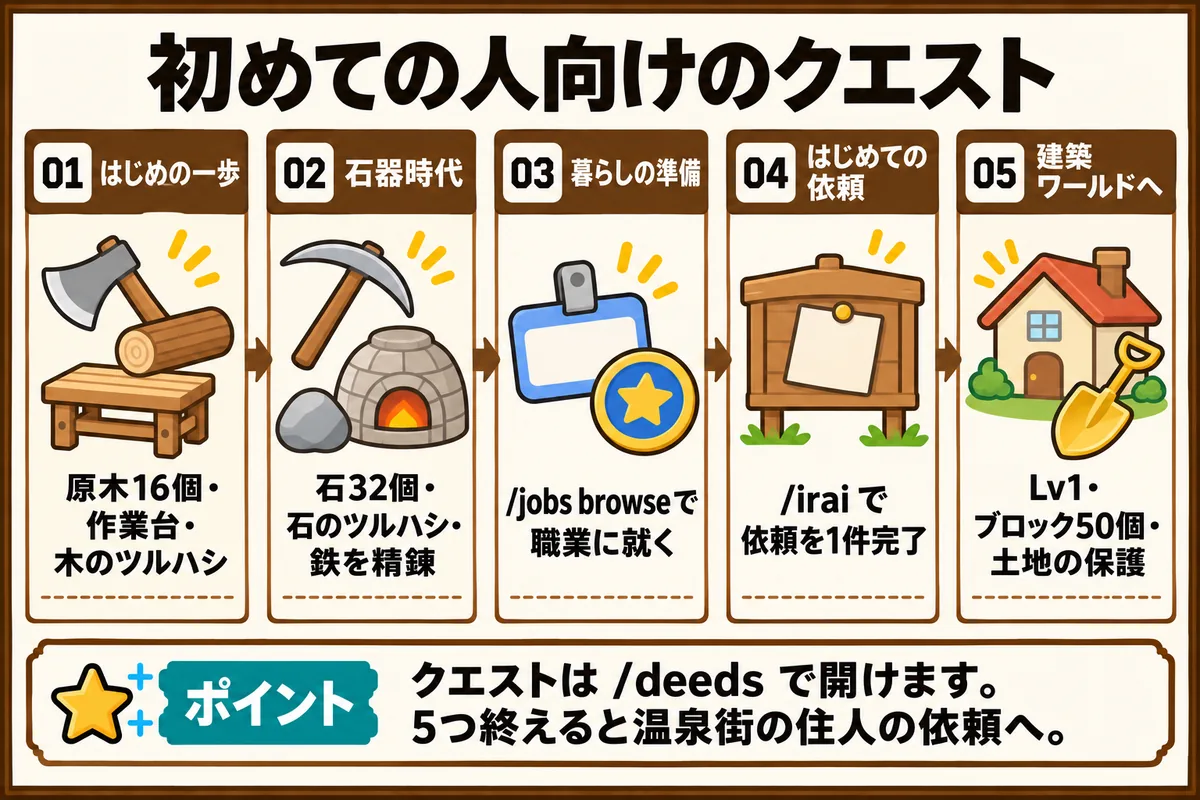
Until you finish 「はじめての依頼」, the action bar showing the remaining requirements for Lv1 (「建築ワールドまで あと◯分・進捗◯/5」) does not appear.
See Quests for details. Of these, the two that need commands or preparation, 「暮らしの準備」 and 「建築ワールドへ」, are explained below in quest order.
「暮らしの準備」: take a job with /jobs browse
Open the job list with /jobs browse and click a job to join it.
You can hold 1 job at a time and change it later as often as you like.
「建築ワールドへ」: reach Lv1 and protect land
The last quest goes in this order: reach Lv1, place blocks in the Building World, then protect land.
1. Reach Lv1
Lv1 requires 30 minutes of playtime and 5 advancements. Use /level to see your level, playtime, and completed advancement count.
The advancement list shows what you still need. Java players can check the standard advancement screen, for example with L. Bedrock players can check by entering /adv in chat.
2. Place blocks in the Building Server
Once you are Lv1, enter the Building Server through the lobby’s south gate and place 50 blocks. Blocks placed before this quest became available do not count.
3. Protect land with the golden shovel
Receive the golden shovel for land protection from 「土地を守る」 (Protect land) on the smartphone (up to 1 per day). /claimshovel does the same thing. An ordinary golden shovel you craft yourself at a crafting table also protects land.
Land can be protected only in the Building Server. So you can actually use the shovel from Lv1 onward.
Things to do alongside the quests
Check login rewards with /daily
When you join the server, that day’s login reward arrives automatically. On your first day, the first reward arrives 10 seconds after joining (chat and sound only); from your second join onward, it arrives after 3 seconds (with a title).
To check what you have received, or to claim a reward you have not received yet, enter /daily (or /bonus).
If your inventory is full, the reward drops at your feet. Keep some inventory space free.
Register your inviter with /invite
If a friend invited you, register them as your inviter with /invite <inviter>. Do this before your active time since first joining reaches 2 hours. Active time is the time you were active, excluding idle time.
When your total active time reaches 2 hours, your inviter receives 2,000 Spa Coins and you receive 1,000 Spa Coins. See Friend invitations for details.
4. Where to read more
Find the topic you need in the 「えこらいふ!」 (Ecolife!) guide. If you only need a command, use the Command reference.
If something goes wrong
A command is missing or unavailable
Check /help and /level first. Availability depends on your level and permissions.
A gate does not move you, or you cannot enter the Building Server
First, read the on-screen message.
If it says 「まだ入れません」 (You cannot enter yet), you have not reached the level required for that world. Check your current progress with /level. The exact requirements are on Player levels.
If travel fails, 「移動できませんでした。少し待ってからもう一度くぐってください。」 (Travel did not succeed. Wait a little and go through a gate again.) appears. You can go through a gate again after 3 seconds. If it still does not move you, report it with /feedback.
Someone damaged your building or chest
You can find out who did it yourself with /co inspect. See Investigating griefing for instructions.